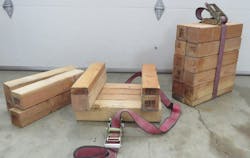
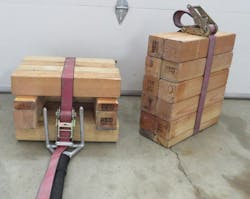
Understanding lashing gives first-arriving personnel the ability to integrate common, simple, robust tools (extending their capabilities) into their “toolbox” and to increase the success of rescue crews.
Many of the applications that are explained below might not be used every day, but once the principles are understood, many functional uses can be deployed.
The ratchet strap
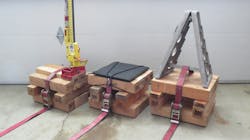
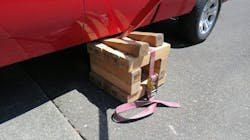
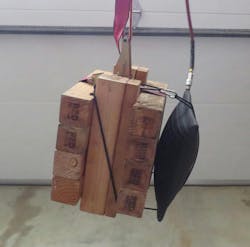
The height limitations of some common tools are overcome by extending their useful range by securing them on a crib stack (Photo 1). These tools can be used on top of a lashed crib stack without making them a part of the assembly. This article focuses on high-lift jacks, pry bars, flat air lifting bags and RescueBlox.
All of the uses are enabled by a 2-inch, 11,000-lbs.-rated, no-hook ratchet strap. A 2-inch two-hook ratchet strap can be converted into a no-hook strap if you follow the instructions in “Lashing a Crib Stack.”
If you purchase 2-inch no-hook straps, make sure that you purchase straps that are made of polyester, not nylon. Nylon straps can be considered a dynamic material (read: have more stretch), much like recreational climbing ropes. Polyester can be compared with static material (read: have less stretch), much like ropes that are used for rescue purposes.
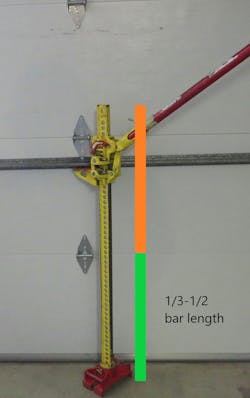
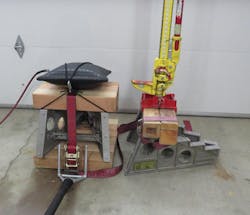
The high-lift jack is a versatile tool for lighter loads. It’s useful and safest lifting range is one-third to one-half of the height of the vertical bar (Photo 2). Once this range is exceeded, the laws of physics start to affect stability.
The tool must remain plumb. If not, it wants to topple/rotate in any direction. Precautions can ensure that the load can’t readily fall, but this potential is multiplied the higher up the bar that a load climbs. If the bulk of the load weight rests above the tongue, this potential will multiply.
If the lift point can be raised to keep most of the weight below the tongue, gravity counters instability and assists in maintaining a plumb position. You can experience these effects by holding a hammer with two fingers by the handle with the head of the hammer at 12 o’clock. The hammer wants to rotate down. However, hold the hammer by the handle with two fingers with the head at 6 o’clock, and the hammer will reconcile plumb with gravity.
The other problem of lifting above the midpoint of the bar is the potential for the bar to buckle. Keeping the load on the lower half of the bar keeps this potential to a minimum.
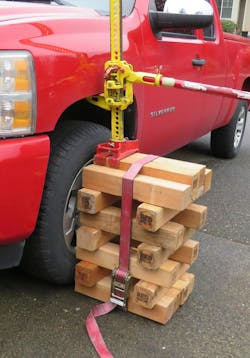
Because the rescue jack is a 4,660-lbs.-rated device, it won’t exceed even one column of a crib stack rating. This means that staying with the recommended geometry (nominal overhang) of a conventional crib stack isn’t needed for the mushrooming effect. Because the tongue of the jack protrudes 4½ inches from the bar, placement on the crib stack is limited. Adjusting the load columns of the crib stack to be directly under the base of the jack produces two columns that provide a combined 12,000-lbs. rating to accommodate the short reach of the jack (Photo 3).
Pry bar fulcrum
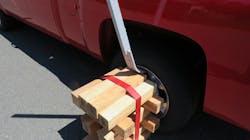
The loose nature of the crib stack and the inability to reposition can impede progress and efficiencies when a pry bar is used for rescue. Photo 4 shows a pry bar used on the upper side of a wheel rim.
The secure nature of the crib stack allows the use of spreaders if needed.
A two-hook strap can be used to up and over the load, to incrementally capture gains by the lift.
When the height of the crib needs to be increased, you can loosen an unloaded crib stack strap, add cribbing pieces and then secure the assembly once again.
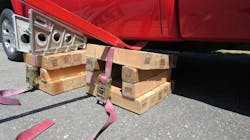
When a flat crib stack is used as a fulcrum or base, the gains can be captured by using wedges next to the lifting device (Photo 5). A sloped fulcrum can be assembled with wedges integrated into the crib stack, giving it built-in increased height by pushing it farther under the load after each lift and securing it by other means without adding cribbing (Photo 6).
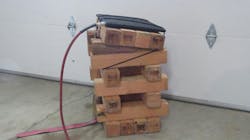
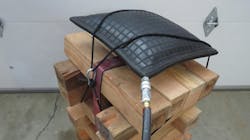
Air lifting bags often are used in tandem with cribbing to fill the void space until lifting can begin. With a lashed crib stack, a one-piece, secured support that’s built to the right height can be maneuvered into place and inflated to fill the void quickly and safely. Once the load is secured, the custom assembly can be deflated, moved (using a long reach tool, such as a trash hook) and reinflated to increase the lift that already was accomplished.
The advent of high-lift air lifting bags increased efficiency and range of lifts (by filling the void space quickly). The inclusion of a handle and wheels opened new lifting areas that previously were unreachable. However, these advantages necessitate increased storage area and add cost. The same advantages can be accomplished by lashing a crib stack then securing a flat air lifting bag to the crib stack. A sloped lashed crib stack with an inflated air lifting bag provides the ability to build to the right height, maneuver to the right location and conform to the new slope angle as the load lifts (Photo 7). A unique bungee enables the air lifting bag to inflate and hold position (Photo 8). A horizontal crib stack with air lifting bag can be deployed using the same technique (Photo 9).
RescueBlox
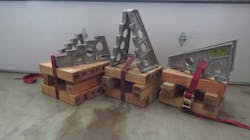
The step chock naturally evolved from cribbing, providing quick support at multiple levels. Most conventional step chocks have a load rating of 3,700–7,000 lbs. A RescueBlox replaces these light-duty step chocks with a 50,000-lbs.-rated capacity unit that’s capable of holding 75,000 lbs. The design allows cribbing to be secured with either the 2-inch no-hook strap on top of the steps or the step chock secured on top of a crib stack or both (Photo 10).
Building on the lashing technique, a RescueBlox is secured in three orientations. All are on a 12-inch crib stack. The left application in Photo 11 shows a lashed center line that makes the working step chock range 16½–22½ inches. The center application is 31 inches high and works excellently on sloped loads, as with a strut, but is dependent on the low side being secure, as with any strut. The application on the right shows a wedge lashed across the crib stack, having a height of 16½–22½ inches. All of these applications can be maneuvered into place using long reach tools.
RescueBlox can support a load with a relatively small load surface and displace the load evenly to the crib stack. This lashing technique also allows these assemblies to be used horizontally.
Stowing and deploying cribbing
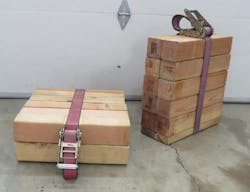
The best way that I found to stow and deploy cribbing is using the 2-inch no-hook strap. The strap gives firefighters a handle to carry cribbing, which allows more cribbing to be moved quickly to the red zone (Photo 12).
When the strap is loosened, a quick, secured platform may be assembled and deployed for use by itself or with tools married to it (Photo 13). By using a 10-and-2 bundle (10 four-by-fours and 2 two-by-fours), a 12-inch platform can be secured quickly (Photo 14).
New perspectives
The purpose of this article is to present new, practical support assemblies using what already is on board apparatus. If departments find one or two of the supports that are described above useful, the goal of this article has been accomplished.
Questions can be emailed to [email protected].
About the Author

Steve Randall
Steve Randall is a 30-year veteran of the fire service and has served 23 years as a career firefighter for the Snoqualmie, WA, Fire Department. He is a certified Rope Rescue and Swiftwater Rescue Technician and is a fire and rescue industry inventor and entrepreneur. Randall can be reached at rescueblox.com.
