University of Extrication: Opening a Vehicle Floorboard for Patient Rescue
Topic: Patient access through a floorboard
Objective: Create a floorboard opening in a crash-scene vehicle
Task: The rescue team shall utilize available tools and techniques to create a floorboard opening of sufficient size for patient access on a roof-resting or a side-resting vehicle
Vehicle rescue teams always like a challenge, particularly during extrication training. They want to remain sharp and efficient at problem-solving, because they are rescuers who want to be able to perform at their very best.
If an instructor were to assign the crew too basic of a task, such as breaking out the side door window glass, it can be perceived as boring to the crew. Ideally, although fundamentals, such as glass-breaking, must be mastered, specific high-level rescue tasks also must be assigned and trained on to challenge the experienced team on various levels.
NFPA 1006: Standard for Technical Rescue Personnel Professional Qualifications distinguishes between the degree of challenge, describing tasks as either being at the operations or technician level. The higher-level technician-level training tasks, skills and problem-solving process lead to more efficient performance at incident scenes.
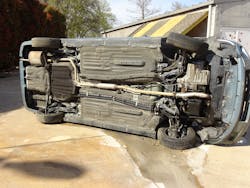
Creating a floorboard opening for patient access is a seemingly simple assignment that is guaranteed to challenge the crew. To start the training for creating a floorboard opening, two rescue manikins should be placed in normal front-seat-occupant positions and seat-belted in place inside of the acquired passenger vehicle. With windows up and doors shut and locked, the vehicle then is placed either driver’s side down or rolled over onto its roof.
The task is to use available rescue tools to create an opening in the undercarriage of the vehicle that’s large enough for every member of the team to crawl through the opening and come out of the other side.” A rotary saw of any kind or a cutting torch of any kind are forbidden.
The assignment and the work that follows meets the NFPA 1006 threshold as a technician-level assignment for one reason: The vehicle is side-resting or roof-resting and, therefore, in an unusual, not-normal position.
With the acquired vehicle in position, the team is assigned its task. The members soon discover that there are several elements that must be completed, including incident management, vehicle stabilization, locating patient(s), creating floorboard access, making a starter hole, creating the opening and crawling through the floorboard.
The team must create an incident management system within their team. Therefore, the team must be capable of operating within a larger-scale incident command system. Experience has shown that the team that completes this task will be most efficient when: a designated team leader is established; an incident action plan is developed and agreed upon; and specific tasks are given out to crewmembers.
Stabilize
Because the acquired vehicle is either side-resting or roof-resting when the drill starts, the team must be capable of stabilizing the vehicle. Several important points must be considered prior to starting stabilization efforts. Most importantly is planning stabilization efforts so as not to interfere with floorboard-opening work. Struts, if used for side-resting stabilization, can’t be placed against the floorpan; they should be located away from the immediate work area where team members will be operating to open the floor. A subframe that exists on the underside of most vehicles might be beneficial for strut stabilization.
If the team realizes that the crash-damaged automobile is an electric vehicle (EV) that has a floorpan-mounted high-voltage battery, breeching the floorpan can be ruled out immediately. For training purposes, we will assume that an internal combustion engine vehicle is being used for this drill.
Locate
Once stabilization is accomplished, the team must locate the patient(s) and know where their arms, hands, legs and feet are. Manikins in the front seat simulate the challenge of a real-world scenario with occupants trapped. We don’t want any rescue-tool contact with a trapped patient.
This is where good communication and coordination between inside and outside rescue crews is important. A functional incident management system, a good team leader, and members who have assigned duties and responsibilities will prove their value here.
When the location and position of all trapped occupants is confirmed, the team can determine where the floorboard opening will be started and what area it will cover. This is where understanding basic vehicle anatomy can be beneficial for the team.
There are items along the floorboard that help orient those who are outside to where things are inside.
The general shape of the floorpan might be of benefit to determine where the front and rear seats are. Seatbelt or front-seat-track mounting bolts also can help to identify where the seats are. In a real crash situation in which the vehicle would have been running up to the point of the crash, hot underside components, such as the catalytic converter, muffler, exhaust pipe, oil pan, transmission and engine block, must be avoided as a safety measure.
During the access step, any items that block or obstruct the area that will be opened must be removed.
Starter hole
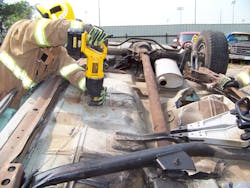
The starter hole, where the floorboard opening will originate, can be a floorboard drain hole (with a rubber plug) or an opening that’s made with a rescue tool. A pick-headed axe, the pike of a Halligan-type bar or the blade of a reciprocating saw can make the initial starter hole opening.
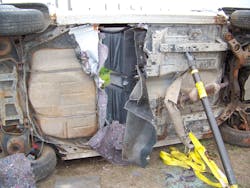
Through the initial starter-hole opening, a visual inspection is made to ensure that the remaining opening work with tools won’t contact the patient. Work to open the floorpan begins from this starter-hole location and continues until the desired dimensions are completed.
Any vehicle component that would interfere with the planned opening area would be removed at this time. This includes the drive shaft, exhaust pipe, electrical wiring and the emergency brake cable.
Create the opening
The crew must understand and agree on the dimensions of the floorboard opening. Members must assess where the patient and inside medic are on the other side of where they will be making the opening.
Several tactics are available for opening the floorboard; cutting/sawing or prying are the primary ones. A cutting tool, such as a power cutter, an air chisel or a reciprocating saw, will go through the metal of the floorpan. The biggest safety concern is that the blade of the reciprocating saw or the chisel bit contacts the patient or any rescuers.
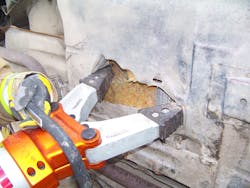
A tactic that every team should be familiar with is prying: inserting a full-size power spreader into the starter hole and prying the floorpan metal apart instead of cutting it. This tactic quickly can create the opening.
The vehicle fuel tank generally is behind the rear seat and is something that should remain in its mounted location if possible. If necessary, it can be removed, but that can be a messy task that introduces the inherent risk of fuel spill.
If any small-diameter fuel lines are in the way, they can be cut and quickly crimped to stop any leakage.
Crawl through
Once the opening work is completed, “sharps” around the opening must be covered with vehicle carpeting, insulating matting or commercially available safety materials. Other hazards, such as sharp, jagged edges and protruding bolts, should be covered or pounded down.
With all edges protected and the team ready, the true test is to have each team member enter through the opening and come out of the other side of the vehicle.
Crewmembers must check that their personal protective clothing is in place from head to toe prior to crawling through the opening. Once every team member makes it through the floorboard breech opening, the task is completed.
Sidebar
Open the Floorboard and Crawl Through Task
· Incident management
· Stabilization
· Locate occupants
· Access floorboard
· Starter hole
· Create the opening
· Crawl through
About the Author
Ron Moore
RON MOORE, who is a Firehouse contributing editor, recently retired as a division chief with the McKinney, TX, Fire Department and now serves with Prosper, TX, Fire Rescue. He self-published the Vehicle Rescue 1-2-3 training manual and serves as the forum moderator for the extrication section of Firehouse.com . Moore can be contacted directly at [email protected].


