University of Extrication: Rescue Chain and Hook Research
Topic: Destructive testing of hooks and chains
Objective: The rescue team shall understand the safety reason for using rescue chains and hooks at or below their working load limit (WLL)
Task: Evaluate use of chains and rescue hooks on equipment and know the WLL of all equipment that has hooks
Individuals who are involved in technician-level vehicle rescue work, particularly rescue instructors, typically have a series of best practices, considered “rules,” that they readily can recite to other rescuers: things that we always do and things that we never do. In that regard, there are general rules that are followed for the use of hooks and chain equipment, including ratchet straps, grab hooks and J-hooks. However, no one seems to know where many of these supposed rules originated or, worse yet, can validate whether the supposed rules are legitimate.
Research parameters
Field research to investigate supposed rules’ validity involved the use of a powerful destructive testing machine, a load cell that has a computer readout, and samples of rescue hooks, straps and chain that were exactly like those that technician-level responders have in their tool inventory. The only exception was that all of the test sample hooks, straps and chain never were used prior to the destructive testing.
There is a critically important term that must be understood: the working load limit (WLL) of a rescue item. Within the field of rescue as well as in civilian applications of this equipment, the WLL is the maximum allowable load that’s assigned to a piece of equipment by its manufacturer. The WLL shouldn’t be exceeded during any rescue application, training or otherwise. To our benefit, a safety factor is built in: the difference between the WLL and the actual breaking point of an item (typically called the design factor). For example, if a rescue component is rated at a WLL of 5,000 lbs. with a 2:1 safety factor, the item is prone to fail at twice the WLL: 10,000 lbs. This is why it’s so important to know the WLL of tools and to rig everything at or below the WLL at all times.
This research project evaluated several well-known do’s and don’ts that are related to tools that have hooks that rescuers use. In every case, the research showed the value of working below the WLL of the item for safety’s sake.
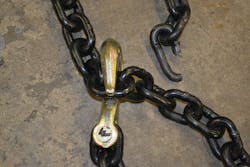
1. Rescuers should place the chain grab hook across the link of a rescue chain with the grab hook on the smooth side of the link.
The belief that’s behind this premise is that the weld that forms each link in a chain is the link’s weak point. The thought is that the grab hook stresses the weld while the chain is under load. Research that was done showed that this isn’t true.
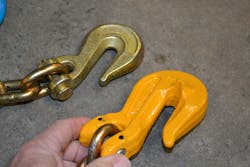
Destructive tests were conducted on 3/8-inch-diameter Grade 7 and Grade 8 rescue chain (a common size and grade). Two types of grab hooks were used: standard grab hooks and grab hooks that have “ears.” For each test, a length of chain that had a grab hook on one end was formed into a loop and pulled to its overload breaking point, which caused something to fail.
The outcome: Hooking onto the smooth side or the weld side of the chain made essentially no difference in the ultimate strength of the equipment (see Premise 1 photograph). Remember, if you rig rescue chain and hook equipment to stay below WLL, you have a built-in safety factor and need not be concerned with which side of the chain link that you hook over.
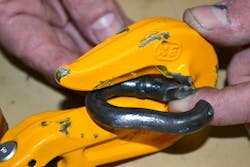
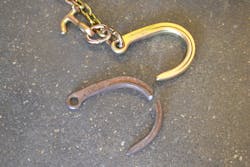
The outcome showed that it didn’t matter which style of grab hook was used. The grab hook that had ears didn’t perform notably better than the standard grab hook. With standard grab hooks, it was possible for the link that failed to be at or near the “throat” of the hook. When the grab hook had ears, the link failure occurred at the outside end of the grab hook ear (see Premise 2 photographs), not at the throat of the hook. Failure peak loads were within a few hundred pounds of force for each type of grab hook.
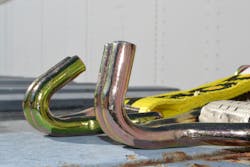
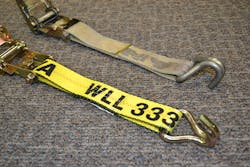
Numerous destructive tests were conducted on 2-inch-wide ratchet strap hooks that were equipped with twin hook ends, not flat snap hooks or S-style hook ends. The WLL of the twin hook ratchet strap hook units was 3,330 lbs. at 3:1.
The outcome: The twin hook ends weren’t the weak link of the entire assembly. Instead, either the webbing or the stitching at the hook failed at peak loads of approximately 11,000 lbs. The twin hooks showed no damage nor deformity when there was a webbing-related failure.
When the twin hooks were tested by themselves and were overloaded (see Premise 3 photograph), they began to bend and straighten at a peak load of more than 12,000 lbs. Remember, the ratchet strap’s WLL is 3,330 lbs., which is a load that provides more than the 3:1 safety factor.
Destructive tests were conducted on: 3/8-inch grab hooks; hooks from 2-inch-wide ratchet strap units; 8-inch and larger J-hooks; and Grade 7, Grade 8 or Grade 10 chain. The mission was to evaluate whether the hook flies in a specific direction at the moment of hook failure based on the orientation of the hook (up or down).
The destructive test machine had a large lid that closed over the machine during the tests. The lid consisted of a heavy-gauge steel mesh. The bottom of the test machine was a bare and smooth concrete floor, similar to a floor that would be found in a factory or warehouse setting.
The outcome showed that a hook-type item will fly in the direction of the smooth side or back of the hook when there is a sudden failure (see Premise 4 photograph). This occurred in every test case when there was a catastrophic failure at overload.
When placed with the smooth side or back of the hook facing up (the open side of the hook facing the floor), when failure occurred, there was contact with the closed lid of the test machine. When positioned with the smooth side or back of the hook facing down, there was contact with the floor at the moment of failure.
In one case, the steel mesh lid was struck so violently by a component that the lid was torn almost completely through. In other cases, the concrete floor was hit so forcefully so many times that chunks of cement were taken out of it.
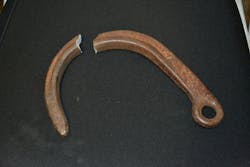
The outcome showed that when loaded in the throat of the hook as recommended by the manufacturer, a J-hook, old or new, can withstand a load that’s equal to its WLL (see Premise 5 photograph). As an example, in one test, the new hook actually fractured at a peak load of 25,127 lbs. Other tests showed that J-hooks might bend and straighten rather than actually fracture. One destructive test showed that a 15-inch J-hook sustained a peak load of 22,758 lbs. before it straightened. It never fractured.
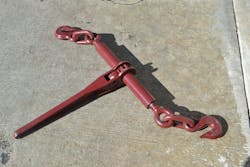
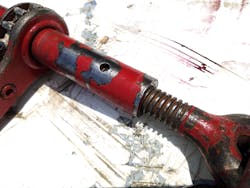
Tests that were conducted on ratchet-style load binders (see Premise 6 photograph) showed that failure results typically from one of the threaded ends that comes out of the body of the load binder. Higher quality units have holes near each end of the hollow body of the tool. If a threaded end is screwed out too far, you will see all of the way through the holes.
The outcome of the testing indicates that when using ratchet-style load binders, the threaded ends shouldn’t extend farther than the safety hole that’s on the body of the binder. When maintained with proper thread overlap (so that the threaded rod remains visible in these inspection holes), the load binder will perform beyond its WLL.About the Author
Ron Moore
RON MOORE, who is a Firehouse contributing editor, recently retired as a division chief with the McKinney, TX, Fire Department and now serves with Prosper, TX, Fire Rescue. He self-published the Vehicle Rescue 1-2-3 training manual and serves as the forum moderator for the extrication section of Firehouse.com . Moore can be contacted directly at [email protected].
