Vehicle technology changes continually, and it’s important that the fire service keep up with these changes. For example, stronger automobiles mean that consumers are safer, but for the fire service, they can mean more difficult extrications, particularly when older tools and techniques are used.
Developing multiple plans of attack, including which extrication techniques to use, depends on your size-up. When you encounter newer vehicles, you should assume that these vehicles will present a more difficult extrication of a victim.
Not junk cars
Newer vehicles are nothing like the automobiles from the junk yard or from a tow company that are used to cut up in training.
Many newer vehicles have high-strength steel (HSS) and ultra-high-strength steel (UHSS) located around the area that makes up the passenger compartment. Your ability to utilize conventional extrication techniques might be limited, particularly when you use older tools.
Often with newer vehicles, you will find wider A-pillars. When you attempt to cut through the A-pillar for a dash displacement, you will find yourself having to make multiple cuts just to get through it. This can be challenging, particularly on the tire side of the A-pillar, because the tire might hinder your ability to get a deep cut.
Dash bar
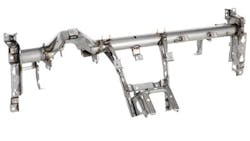
Unibody automobiles are constructed with a dash bar. The dash bar does a few things.
First, it allows for the attachment and housing of the glove box, radio display and air bags.
Second, it acts as a barrier in the event of a front-end collision. It’s designed to stop the vehicle components that are in front of it from coming into the passenger compartment.The dash bar is a steel or composite bar that runs from A-pillar to A-pillar in the front of the vehicle. It is welded to the A-pillars.
For a rescuer, the dash bar provides a great point to push off of to displace the dash without having to make the multiple cuts that are required for a dash lift or a dash roll.
Using the dash bar
For the aforementioned reasons—UHSS, extra-wide A-pillars—the cut-less dash displacement should be your Plan A for dash displacement when dealing with a unibody vehicle. (That said, always have a Plan B, which can include conventional dash displacement techniques. However, remember that conventional dash displacements—the dash lift and the dash roll—require multiple relief cuts, and multiple relief cuts require time and staffing. The cut-less dash displacement eliminates the need for relief cuts, thus reducing extrication time.)
Take the following steps to perform the cut-less dash displacement.
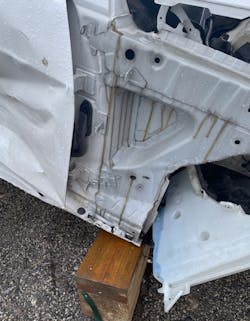
First, place cribbing to carry the load force of your spreader. Typically, when doing a dash lift, you put cribbing directly under the A-pillar at the rocker. However, because you will have one arm of the spreader pushing off of the rocker channel behind the A-pillar and not in a relief cut, you must place cribbing just to the rear of that A-pillar under the rocker.Second, pop off the plastic trim from the rocker. This can be accomplished by using a screwdriver or stripping tool.
Third, set the spreader. You want the bottom arm of the spreader to be as close to the A-pillar as possible. When looking at the rocker channel, you’ll notice a small lip that rises above the rest of the rocker channel. That lip is your landmark for the bottom spreader arm.
With the bottom spreader arm resting on the lip, slowly ride the top spreader arm up the A-pillar just under the glove box. The top spreader arm always should maintain contact with the A-pillar as it slides along it. Going slowly helps to ensure that you keep the bottom spreader arm on the lip that’s located on the rocker and get the top spreader arm into position.
Finally, once you have one spreader arm on the rocker channel and the other on the dash bar continue to open. Again, opening the spreader slowly ensures the ability to seat the top spreader arm just under the dash bar.
This part of the operation often is the most difficult, because you’re unable to see the dash bar, given that it’s covered by the dash. A trick to helping to locate the dash bar is to peel back the plastic on the side of dash where the door closes against it. However, it might not be possible to remove the plastic. In that case, if you look closely along the A-pillar, you’ll see the connection point of the dash bar to the A-pillar. This allows you to judge your placement and to grab the bar as you spread. You know that the top spreader arm is in position on the dash bar when the spreader meets resistance and begins to slow its opening. If the spreader continues to open and you just are breaking the dash, you must move the top spreader arm closer to the A-pillar.
Your goal is to break the weld that holds the dash bar to the A-pillar. Once the weld is broken, you’ll get dash displacement without having to make a single relief cut.
Dash tie down strap
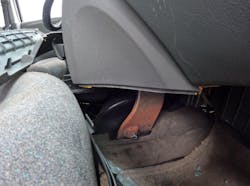
The cut-less dash displacement produces good displacement of the dash, but in the event that you need more displacement, you can cut the dash tie down strap.The dash tie down strap is located along the transmission hub on both the passenger and driver’s sides. The straps attach the dash bar to the floor of the vehicle. Just as is the case with conventional dash displacement techniques, these straps can limit the height of your push.
Cutting the dash tie down strap can be accomplished with your Ajax tool, reciprocating saw or cutter, if you can get them into position.
More efficient, but …
The cut-less dash displacement can make you more efficient. However, a drawback of the technique is the reliance on the rocker channel for a push point. Although we’re starting to see more UHSS in rocker channels, some vehicles might not have that. Improper placement of cribbing or damage to the rocker can lead to the rocker failing and ripping away from the vehicle body. This is why you always have a Plan B: If you encounter those failures, you can move to traditional methods for dash displacement via the dash lift or dash roll.
About the Author

Chris Soda
Chris Soda is a 17-year member of the Chicago Fire Department (CFD), where he currently is assigned to Engine Company 96 in the city’s Austin neighborhood. He teaches at Northeastern Illinois Public Safety Training Academy, where he is the program coordinator for the Vehicle & Machinery Operations and Vehicle & Machinery Technician programs. Soda also has been an instructor for the CFD’s Quinn Fire Academy, teaching candidate firefighter’s vehicle extrication. He is the owner of Junk Yard Dog Extrication Training, where he teaches emergency response to electric vehicles.


