Self-rescue is a critical skill. It’s defined as actions and techniques that are taken by either an individual or a team to retreat or advance from situations that otherwise would leave them unprepared, stranded or, possibly, dead. Can you save yourself? If you can’t, what are the chances that you will be effective at rescuing someone else? Numerous factors influence whether you will be able to self-rescue, such as physical fitness, rescue equipment, your ability to communicate effectively with shore-based personnel and environmental conditions. Regarding the latter, it’s important to have a basic understanding of ice and water characteristics.
Water and ice
As surely many scuba divers know, water is 800 times denser than air, and it often is referred to as the 800-lb. gorilla. It’s much more difficult to move effectively in constricting water and in breaking ice than it is on land.
Environment can put tremendous stress on you. Imagine yourself in a high-altitude situation trying to self-rescue: Breathing and perceived exertion will be affected not only by the dense water but by the lack of oxygen at the high elevation.
It always is a good idea to evaluate each static ice rescue response that one encounters from the least possible risk to the greatest possible risk to the rescuer.
The least risk always will be from the shore and starts with communication. The rescuer might be able to talk the victim through the process of self-rescue, with potentially the greatest benefit to the victim.
Next in the level of risk is offering with a reach device—to throw the victim a throw bag or ring buoy or the like.
Once you decide to go out onto weak, thin ice, in the likely possibility that you will break through, you must be able to self-rescue out of the water and ice and back onto a stable, but fragile, ice shelf. This is the reason why the rescuer must be physically fit and strong and have a sound mind. The latter means possessing the fortitude to make good judgement calls in the time of stressful situations and a presence of mind that considers the victim’s plight while not making that individual the number one priority. Without doubt, the number one focus always should be placed on you, the rescuer, and your safety.
The ice suit
Another area that must be considered is the use of ice rescue suits, because these suits can and will impede self-rescue if they aren’t the proper suit for the job or the proper size for the rescuer.
Let’s examine: Most ice rescue suits come in one size. (Manufacturers of these suits state that “one size suit fits most people.”) The reality is that this “one-size-fits-most” suit fits most larger-size people, not average-size or smaller people.
When considering who should go out onto the fragile ice, you should ask yourself, should the larger person, who is, let’s say, 6 feet tall and weighs 230 lbs., be the choice, or should it be the person who is 5 feet, 2 inches tall and weighs 135 lbs.? The answer is obvious: the smaller, lighter-weight individual. Unfortunately, the “one-size-fits-most” suit doesn’t fit the bill for the smaller, lighter-weight rescue technician. Improper fit of an ice rescue suit will make self-rescue that much more difficult and victim rescue nearly impossible.
Numerous manufacturers do produce suits that are designed for smaller rescuers. Take the time to do your research before purchasing your ice rescue suit.
The ice rescue suit must be equipped with an NFPA-rated harness (attached or added) and attached ice awls. Boots that have an ice-gripping sole or traction devices, such as ice cleats, also are required.
When training for self-rescue, you employ the practice of four self-rescue skills that serve as building blocks for increased success and confidence when you find yourself in a position to utilize self-rescue.
- Communication. Shore support should establish communication with the victim as soon as they arrive. (Communication protocols must be set in place before you ever get the call for help.) In addition, shore personnel must have clear, concise communication with the rescue technician. This communication can be established with simple hand signals that are understood easily by both shore personnel and the rescue technician. Poor communication leads to rescue failure. Make establishing communication a priority and part of your SOPs.
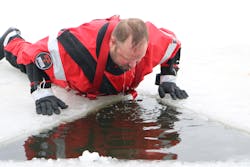
- Prevent cold shock response. Rescue technicians can prepare for cold shock response by simply acclimating their face to the ice-cold water. This is accomplished by submerging their face in the cold water and exhausting their breath by blowing bubbles into the water, the latter to eliminate the gasp reflex that potentially can obstruct one’s airway. Rescuers should do this a few times before going onto the ice. In addition, this skill is important because you don’t want to splash or submerge the victim. Remember, the victim might have been immersed for quite some time and doesn’t need to experience more trauma.
- Crawl on your belly. After rescuers acclimate their face, they must do the “army crawl.” This is done to distribute their weight on the ice while they make progress toward the victim. Rescue technicians should keep their hands and legs sprawled out, and they should make small, calculated movements to try to avoid submergence.
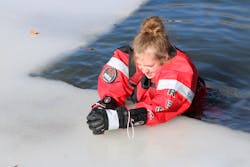
- Prepare for immersion. Enter the water feet first. Yes, you will feel the hydrostatic pressure that presses on your lower extremities (approximately 432 foot-pounds in freshwater). This pressure allows you to burp, or let trapped air to escape from, your suit. This is accomplished by getting the air to move from the feet of the ice rescue suit to exhausting it out of the neck opening. This process increases rescuer safety and minimizes potential for inversion. The lower extremities should drop vertically in the water, which allows easier, more effective movements in the water.
Scenario 1: The rescue technician falls through the ice while trying to get out across the ice to the victim.
Tools that can make self-rescue easier and more effective: ice awls or ice picks. It’s imperative for rescue technicians to have a set of ice awls: one ice awl for each hand, fastened to each wrist. You can get yourself out of an ice hole with just one ice awl, but safety is in redundancy. Furthermore, always have a backup ice awl. These small but effective devices always should be worn when going out onto the ice.
Simply, ice awls are used to get a grip into the ice. Once firmly planted onto the ice shelf, they help to assist with the rescue technician’s extrication from submergence to back on top of the ice shelf.
Rescue technicians also might provide the victim with a pair of ice awls for self-rescue extrication, provided, of course, that the victim is able to self-rescue.
Scenario 2: The rescuer falls through the ice but has a reach pole in hand.
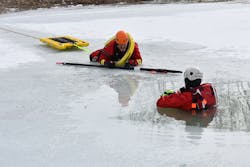
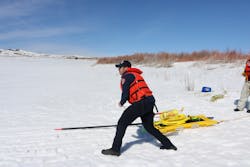
The rescuer can use a buoyant reach pole in numerous ways. It can provide stabilization while one moves across the ice. If the rescuer falls through the ice, the length of the reach pole can disperse that person’s weight, with nearly 7–10 feet of displacement. This displacement helps the rescuer to push and pull back onto the ice shelf.
The reach pole also can be used to reach shore support, to have them pull the rescuer toward shore or to a safer zone.
Some poles are telescoping and come equipped with an ice awl that might be used in a vertical fashion to grip the ice to help the rescuer to self-rescue.
Scenario 3: The rescuer falls through the ice without ice awls or a reach pole.
Shore-based personnel can help the rescuer to self-rescue by throwing something to that individual to pull back onto the ice. A shore-based rescue response always should include a throwing device, whether it’s a ring buoy or a simple throw bag that’s stuffed with 75 feet of buoyant rope. Once the throw bag or ring buoy is deployed from shore, provided that it lands within reach of the rescuer, the rescuer can self-rescue by pulling back onto the ice.
This method also can be carried out with the use of a buoyant tether line.
Scenario 4: A victim is approximately 100 feet from shore. There is 30 feet of open water for the rescuer to go through before the ice shelf begins.
The rescue technician can traverse the open body of water with the aid of a buoyant ice rescue sled. The rescue technician can extricate him/herself from the open body of water. The ice rescue sled offers not only buoyancy but is designed to help rescue technicians to self-rescue back onto the ice shelf. The rescue technician pulls onto the ice rescue sled and paddles toward the shore or toward the victim.
The rescuer always should be tethered and supported by shore-based personnel.
The fundamentals
Self-rescue is the basis for any successful rescue. If you can’t self-rescue, you shouldn’t endanger yourself or others by attempting to rescue a victim.
You can eliminate many issues prior to ever having to make an actual rescue. Learning self-rescue skills and gaining knowledge through proper training will prepare you for a successful self-rescue.
About the Author

Bo Tibbetts
Bo Tibbetts is the full-time owner and water operations instructor for Public Safety Dive Services, a division of Technical Rescue International. He has been providing training services to public safety personnel for 17 years. Tibbetts is most noted with water operations, including surface ice rescue, swiftwater rescue, urban flood rescue, small boat operations, dive rescue and recovery operations. He has been instrumental in standardizing many water rescue industry standards and was accredited with numerous leading-edge ice rescue methodologies that are designed to keep rescue professionals safer. Tibbetts recently authored a segment of the second edition of the Water Rescue manual by Jones & Bartlett. He can be reached at [email protected].


