Forcible Entry: Saw Basics for Doors & Gates
There is no denying that your best deployment of tools comes from a great set-up of your tools. It’s of utmost importance that irons are rust free and that Halligans are tuned, oiled and in a respectable spot to quickly grab them at incident scenes.
What about rotary saws? How are you setting them up? How many do you have on the rig? Are they in a respectable space, ready for rapid deployment?
All of these questions must be explored when you configure your rig for the tactics that you’re expected to perform—and perform them quickly. Further, it doesn’t matter whether you will use a gasoline- or battery-powered saw. Three main factors play a role in saw basics and set-up.
Recognition of the need
As an organization/department or a company, you must first understand the needs of your area and then base your tools on those needs. What do I mean by this? You must understand the makeup of your community. For example, the makeup of my department’s community is a wild mix of urban and suburban residential and commercial occupancies. There is no one type of structure or challenge that my district presents the absolute most.
In going to some of the commercial areas, the probability of my crews having to cut locks, garage doors, burglar bars, and various types of metal and steel doors is great. That said, although my response area is a smaller urban city, it isn’t inundated with steel roll doors, such as is the case in New York City and Washington D.C. Nevertheless, we must make entry on them periodically. Having the means to accomplish that and the other aforementioned cutting only is possible by having a variety of tools. Sure, we might accomplish the task with a standard set of irons, but we could effectively and efficiently gain entry a lot faster if we use a rotary saw that was set up for forcible entry tactics.
The set-up
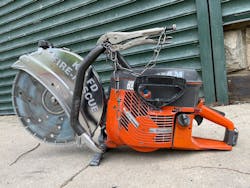
A lot of our success in being efficient comes from our setup on the rig. One of the things that we found to be of great benefit is having a good saw complement. Our special services are set up with four saws for four different types of common operations and call types: two chainsaws and two rotary saws. One of the chainsaws is used for utility purposes, such as cutting tree limbs and miscellaneous woods, and the other is used for vertical ventilation operations. One of the rotary saws is set up with a carbide-tipped blade for wood and decking material; the other has a diamond-tipped blade for cutting metals and masonry. The latter is the one that we consider our forcible entry saw.The forcible entry saw is the one that’s used primarily for the metal challenges that we face in the street. On it, we attach a pair of locking pliers, or Vise-Grips, and chain to the handle. This allows for the saw operator to quickly hand them to another member for attaching to a lock for cutting while making access. (The alternative—the locking pliers and chain being in a compartment on the rig—requires the additional time for someone to retrieve them on the incident scene.) Furthermore, with this setup, the locking pliers and chain never get in the way of the operations. Some members find that having their own pair of locking pliers in their pocket is beneficial; however, lugging them around despite not using them everyday, or even close to everyday, isn’t worth it to me.
Comfort and familiarization
When you use the rotary saw on the fireground, you first must have a good understanding of how to use it on the training ground.
Once you fire up a rotary saw and lift it off of the ground to get after your material, you are fighting a gyroscopic force, and you must be ready for it. Many of you might remember the old gyroscope toy: the device that had a wheel that would spin forward and then when you picked it up or moved it, the side of the toy would go left or right. That is the rotary saw while in use. Once you pull the trigger, the blade spins forward, but when you pick up the saw to use it, the saw's motor wants to take the saw left or right. Using a saw in front of you, to the side or even above your head can wear on you because of the gyroscopic force that you are combatting. This is particularly the case when you are operating for a long period of time.
So, always ensure that your grip on the saw is firm and be prepared for the lateral movement once you squeeze the trigger.
Gate tactics
When you arrive on scene and decide to start cutting, there are a few things that you must consider up front:
- What’s the fastest way for you to get in? Through the lock or through the gate?
- What will take fewer cuts?
- What’s the weakest point on the gate or door?
- Once opened, will the entry point lead you to where crews will be in position to make a difference on the fire or get to it?
You then can execute your tactics. Two of the simplest tactics sometimes are the fastest options.
Commonly, the simplest way always will be to go through the lock itself (depending on the type of lock). Going through the gate’s rail or channel is the next simplest option. Going through the gate itself is the last option.Given the different constructions of gates, the best way to see how to defeat the ones that are in your area and to develop your game plan for entry is to get out and check out how they are constructed as well as the locking mechanisms that are on them.
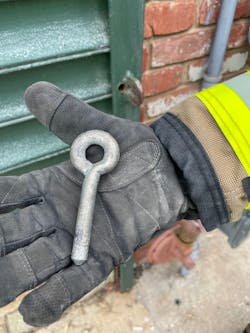
Most gates have either a shielded lock pin or a steel eye bolt pin that’s passed through the rail of the gate and into the metal slats. Most of the time, you’ll find that the shielded pin uses hockey-puck-style locks, whereas the eye bolt pin uses a style of lock that generally has an exposed shackle. With either style of lock, cutting the lock itself from the gate pin provides the fastest approach.
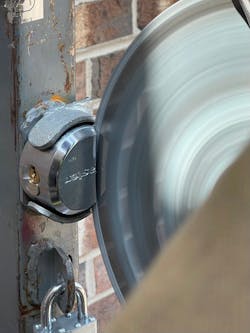
Locks that have exposed shackles are relatively easy to deal with than the other two aforementioned locks. This is where your locking pliers and chain come into play. Although this tactic requires two members to accomplish, the execution is fairly simple. One member attaches the locking pliers and chain to the body of the padlock, and the other member comes in with the saw and cuts the shackle. We have found that scoring the metal with the saw blade at a low rpm is helpful, making a nice groove for the blade to sit in. Once the blade is stabilized, you can rev up the saw, maximizing the rpm, to let the saw blade do its thing and cut the shackle. Once the shackle(s) is cut, the lock can be removed, and the pin can be exposed and removed.With hockey-puck-style locks, the cut is made on the front/top of the lock, three-quarters of the way up from the keyhole. This guarantees that you capture the pin on the backside of the lock.
The old way of teaching encourages cutting the lock across the top of the lock’s company stamp or name. Unfortunately, more and more locks have stamps that are found upside down—or even nonexistent—which leaves members to wonder where to cut. Three-quarters of the way up from the keyhole has been holding true for all of those different style locks thus far.
Training
Recognizing the need, setting up the saw and understanding your tactics all help you to be comfortable with using the saw. However, because there are numerous different types of saws on the market, being sure about how your saw operates is crucial. In the same vein, take the time to get out in your area to check out the forcible entry challenges that are presented. Trying to figure out these challenges or the variables to these challenges in the heat of the moment delays the hoseline getting in place, and a delay in getting water on the fire only contributes to the advancement of fire spread. Everything rides on how quickly and efficiently you can make access.
Training to cut locks can be a simple, yet fun, exercise that members can practice right in the station, for little to no cost, but building confidence with the saw is extremely valuable.

Robert "RJ" James
Robert “RJ” James is a 22-year veteran of the fire service. He started as a volunteer firefighter with the Cromwell, CT, Volunteer Fire Department. After that, James joined the Rockville Volunteer Fire Department in Montgomery County, MD. He currently is a career lieutenant in Special Operations Command assigned to the 3rd Battalion with the Frederick County, MD, Fire Department. James served as a lead instructor for many fire department trainings and works as an instructor, including with Capitol Fire Training. He has received numerous citations and awards. James has written articles for numerous magazines and has taught on national fire service platforms.


