Finishing up our look at extrication, we will examine a few techniques that will add speed, space, and efficiency to the extrication operation. Working within the “Golden Hour” and the “Platinum Ten” arena requires our operations to be quick, deliberate and safe. These additional skills will aid in patient disentanglement while providing maximum space in a proficient amount of time.
Keep in mind as we discuss these skills, that many steps have already been completed prior to arriving at this point. Stabilization has been established and is on-going; the incident scene has been secured; power supply to the vehicles has been secured; necessary glass has been removed; and patient care has commenced. We will pick up each skill at this point in our discussion.
Third-Door Procedure
Two-door vehicles have limitations when it comes to rear-seat access. There are times when accessing a patient in the rear-seat area will require some unconventional thinking. Normal access for passengers to pass between the “B” post and the front seat when getting to the rear seat will not work when removing an injured patient. Therefore, we need to make another access point or “third door” in the vehicle.
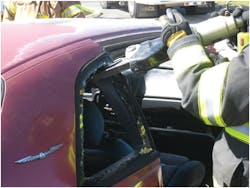
The first step is to access the rear panel and “B” post area by removing the front door from the nader pin/door striker assembly. Once that is completed, the cutters are used to make four cuts in the panel area: rescuers cut the “B” post in two locations, one at the top of the post, and a parallel cut in the bottom of the post by the rocker channel (see Photo 1). The next cut is made on a 45-degree angle, at the bottom left corner of the rear glass area for the rear seat. The last cut is made in the wheel well, connecting to the third cut that runs from the rear-glass area (See Ohoto 2). Once these cuts are made, the hydraulic spreaders are placed onto the “B” post, on a 45-degree angle, a few inches above the door-latch area. Two rescuers clamp the spreaders onto the panel, and with an outward/downward motion, the panel is displaced to allow access to the rear-seat area (see Photo 3).
Full Side Removal
Four-door vehicles pose a stabilization problem for rescuers when it comes to patient care. Medical personnel may be required to manipulate cervical stabilization around a displaced “B” post in an accident. Furthermore, side-impact collisions may hinder access to center-door striker assemblies and hinge areas on sedans. With this in mind, it may be best to remove the entire side of the vehicle in one maneuver.
Rescuers begin at the nader pin/door striker assembly area for the rear door, and displace the door from the connection (see Photo 4). Next, the cutters are utilized to cut completely through the top of the “B” post, and to place a relief cut in the bottom of the “B” post, parallel to the rocker channel. Be sure to cut the seat belt so the belt does not hinder the removal of the post.
The next step requires the rescuers to place the spreader tips into the lower relief cut in the “B” post, and in an outward/upward direction, displace the “B” post from the vehicle (see Photo 5). It will be necessary to support the rocker channel below the post to avoid pushing the channel assembly downward, instead of displacing the post. There has continually been debates about which cut to make first on the “B” post, the top cut or displace the relief cut. It has been my experience that the post displacement works much better when the top of the post is cut prior to displacement. After the post is displaced from the vehicle, rescuers can spread or cut the front door hinges, removing the entire side panel assembly from the vehicle (see Photo 6). Be sure to have some wire cutters on hand to cut any wiring for power accessories that may be in the door assemblies.
High-Dash Displacement
Front impact collisions can compound the problems found on the extrication scene. When two vehicles collide while traveling in opposite directions, the impact force can be increased exponentially. For example, consider two vehicles traveling in opposite directions down a stretch of highway. If the vehicles were to collide head-on into each other while traveling at 50 miles an hour, the kinetic energy absorbed throughout the passenger compartment can be the equivalent of hitting a stationary object at 100 miles an hour, making patient injuries much more severe, and possibly displacing the front of the vehicle completely downward onto the roadway. Additionally, when the vehicles come to rest, the front of the passenger compartment may be pushed down upon the occupants, hindering access. Furthermore, when the vehicle is up against a stationary object, it will be very difficult to displace the dashboard and firewall assembly back off the occupants. In this case, the High-Dash Displacement is successful for disentanglement, as it will allow for displacement without driving the front of the vehicle downward, or into the object the vehicle is resting against.
To execute this maneuver, the doors on the patient’s side of the vehicle have already been removed, and the roof assembly has been either rolled back or removed completely. Rescuers make two parallel cuts into the “A” post; one directly above the lower hinge, and one directly below the lower hinge (see Photo 7). Two more cuts are crucial in performing this maneuver: one cut is made from the lower side of the front wheel well, just behind the center of the wheel well, and the other cut is made from the top of the fender area, just behind the shock absorber/strut tower. Note: There is a structural metal fender channel located in the vicinity of the top cut area, between the fender and the hood. It is vital that this channel is cut completely through, or the dashboard will not successfully displace.
Once these relief cuts have been made, the spreaders are used to first clamp onto the area between the two parallel cuts in the lower-hinge area, and bend the material out of the way (see Photo 8). This will allow for a large purchase point for the spreader tips to be set into place. At this time, additional cribbing/support should be put in place below the “A” post, so the bottom of the channel does not displace. The spreaders are then opened slowly, being sure to keep the handle of the tool parallel with the ground, or slightly tilted upward; this will increase the tool’s capability to lift the dashboard upward, instead of deflecting the lower region of the “A” post outward. Lifting the “A” post will result in displacing the dashboard area, while pivoting the fender assembly at the relief cut in front of the strut tower (see Photo 9).
Conclusion
The objective of this month’s discussion was to arm the rescuer with three more tools in their “tool cache” for use whenever they are faced with an unorthodox rescue situation on the extrication scene. There are many more maneuvers that rescuers utilize and share within the extrication world; what works for some companies may not be successful for others. It is highly advisable to take these skills and practice them on actual vehicles before the next extrication run comes in. Having the time and resources available to practice prior to the emergency will increase the effectiveness and efficiency of the company when they are deployed to the emergency.
Until next time, stay focused and stay safe.
- See Michael Daley Live! Michael P. Daley will be teaching "Firefighting Operations in Strip Malls and Taxpayers" at Firehouse World, in San Diego, on March 1, 2011.
MICHAEL P. DALEY is a lieutenant and training officer with the Monroe Township, NJ, Fire District No. 3, and is an instructor with the Middlesex County Fire Academy, where he is responsible for rescue training curriculum development. Mike has an extensive background in fire service operations and holds degrees in business management and public safety administration. Mike serves as a rescue officer with the New Jersey Urban Search and Rescue Task Force 1 and is a managing member for Fire Service Performance Concepts, a consultant group that provides assistance and support to fire departments with their training programs and course development. Mike has been guest on several Firehouse.com Podcasts including: Successful Rescue Operations in Today's Fire Service, Preparing for Tomorrow's RIT Deployment Today and Basement Fire Tactics Roundtable podcasts. View all of Michael's articles and podcasts here. You can reach Michael by e-mail at: [email protected].
Michael Daley
MICHAEL DALEY, who is a Firehouse contributing editor, is a 37-year veteran who serves as a captain and department training officer in Monroe Township, NJ. He is a staff instructor at multiple New Jersey fire academies and is an adjunct professor in the Fire Science Program at Middlesex County College. Daley is a nationally known instructor who has presented at multiple conferences, including Firehouse Expo and Firehouse World. His education includes accreditations as a Chief Training Officer and a Fire Investigator, and he completed the Craftsman Level of education with Project Kill the Flashover. Daley is a member of the Institution of Fire Engineers and a FEMA Instructor and Rescue Officer with NJ Urban Search and Rescue Task Force 1. He operates Fire Service Performance Concepts, which is a training and research firm that delivers and develops training courses in many fire service competencies.
