Topic: Crash-scene tasks that involve vehicle fluids
Objective: The rescue team shall develop a protocol for management of vehicle-fluid spills or leaks at crash scenes
Task: The rescue team shall practice procedures for fuel tank removal from a crash-damaged vehicle
At a crash scene, particularly one that involves a vehicle that has an internal combustion gasoline engine, responders always must be alert for and determine whether there are any leaks or spills of liquid. When fuel is leaking or spilled, operations can become complicated, and the spillage can interfere with patient extrication. For each challenge that’s presented by a fluid leak, there are options to deal with the situation, including a somewhat uncommon solution to a fuel leak that could be interfering with an extrication: total fuel tank removal.
Upon arrival
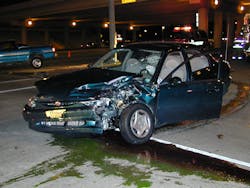
As responders arrive at a crash scene, regardless of whether there are injuries or entrapment, an initial assessment size-up of the scene is conducted. During this walk-around, an effort must be made to identify the presence of any liquid that is leaking or spilled.
If a leaking or spilled liquid is detected, the type of fluid and its source must be determined. This can involve looking beneath the vehicle or checking within the engine compartment or trunk area. In a worst-case scenario, the liquid would be from a broken fuel line that’s inaccessible or from a puncture that’s in the fuel tank itself.
If the fuel line is damaged and leaking, depending on where the leak is located, additional fuel still can spill out, which would add to the vapors that already are in the area. However, a puncture hole or tear in the fuel tank might show that a significant quantity of fuel already spilled. Either way, determining the source of the leak or spill is vitally important. Remember that with liquids, particularly gasoline, it is the concentration of vapors that are the real hazard.
At the same time that the officer or crew works to find the source of the leak, rescuers must identify what fluid is leaking. Knowing what they are dealing with at the crash scene allows responders to determine the degree of hazard and/or risk that the fluid and any vapors contribute to the situation.
As a general guide, a green-colored fluid that’s near the front of a crash-damaged vehicle typically indicates a leak or spill of antifreeze solution. A dark red-colored fluid typically is transmission fluid. A brown-colored fluid most likely is engine oil, and a blue-green fluid typically is gasoline or diesel fuel.Dealing with fluid
Once the source of the fluid leak or spill is determined and the type of fluid is known, a priority can be established for dealing with the fluid. Gasoline vapors are a high-priority problem, with a great ignition and flash fire potential. Leaking transmission fluid or antifreeze, on the other hand, might be nothing more than a slip or trip hazard for responders. If liquid fuel is leaking and ignited, the vehicle fire plus the fuel leak then become a top priority for action.
If a fuel spill is occurring and vapors are present, but fire isn’t, many departments deploy a charged standby hoseline uphill and upwind quickly. A multipurpose dry chemical-type portable fire extinguisher also could be called for if sanctioned by the department. Regardless, the safety equipment should be staffed with a firefighter who is in full PPE, with his/her SCBA donned or immediately ready.
Following hazmat protocols for the department, there are several strategies for managing spilled liquids at a crash scene. Operations-level personnel who are on scene should be capable of accomplishing such tasks as absorbing, crimping, plugging, containing and diking the leaking or spilled fluid when it is from the vehicle itself. It is within reason that more highly trained hazmat personnel would handle leaks or spills of a liquid that’s carried as cargo.
Several general strategies for fluid management at crash scenes include:
Absorbing: Because it is a hydrocarbon, vehicle fuel might be able to be absorbed by synthetic pads that are designed for this purpose. (Many other types of commercially available absorbent materials are suited for such situations.) This effort would serve as a holding action until certified hazmat crews can arrive and use additional equipment and techniques to effectively stop the leak and mitigate the hazard. In the case of a passenger vehicle, anticipate 20 gallons (U.S.) or more in the vehicle’s fuel tank and easily double that for large SUVs and pickups. In the case of the fuel tank of an over-the-road truck, the quantity could be 150 gallons (U.S.) per tank.
Crimping: Rescue crews who are on scene should have the tools and ability to accomplish crimping or clamping of a fuel line. This can involve working with simple hand tools, such as pliers, to crimp the line and remain in place. The fuel line along the undercarriage of the cab of a truck could be squeezed and crimped shut as well if the line is accessible.
Plugging: Plugging a liquid leak might be a possible means of stopping or, at least, controlling a leak. When a broken fuel line is involved, plugging equipment or even a wooden golf tee might be a very valuable asset.
Containing: A liquid that can’t be stopped from leaking might be able to be contained, or captured, in plastic buckets or pliable bucket liners. Hazmat teams even use small swimming pools as containment vessels when large quantities of fluids are involved.
Diking: Spilled fluids that are on the roadway might be able to be contained by diking with absorbent materials to limit their spread. Commercially available hazmat booms or even improvised items, such as sand, dirt or gravel, might work initially. Diking is an operations-level hazmat skill that responders should be able to accomplish.Remove the tank
Although not the norm, total fuel tank removal should be practiced by rescue teams for that rare situation that can confront them.
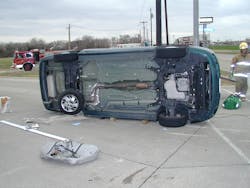
As a real-world example, a side-resting, driver-side-down passenger vehicle was encountered on a roadway. With the driver trapped and extrication anticipated, the rescue officer conducted an initial walk-around size-up.
A damaged fuel tank on the automobile was visible. A small leak of gasoline was visible running down the undercarriage and onto the roadway. Gasoline vapors permeated the interior of the vehicle. After a standby hoseline was stretched and staffed, the vehicle was stabilized, and the vehicle fuel tank was removed.
To mimic this situation, rescue crews should create training situations, so they can develop procedures and practice various techniques to accomplish total fuel tank removal from a passenger vehicle. These training scenarios would include roof-resting and side-resting vehicle positions, not a vehicle that’s on its wheels on a level surface. Although there always is an inherent risk involved when dealing with a fuel tank, in a real-world situation, the short-lived risk might be acceptable when the fuel hazard can be completely removed from the incident.
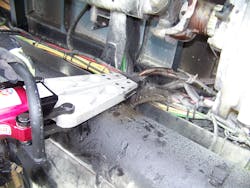
To accomplish passenger vehicle fuel tank removal, the one or two mild-steel banding straps that hold the fuel tank in place must be accessed and disconnected or cut through. Heavy-duty tin snips or power rescue cutters can do this, although a no-spark environment must be maintained regardless of what tool is used.
Once both banding straps are cut or unbolted, the tank becomes loose. Fuel lines can be crimped and cut through, and any wires that are attached to the tank can be disconnected.
The filler hose protrudes a short distance into the tank. Usually, a rubber gasket is around the tank opening. It will pull free easily, allowing the fuel tank to be removed.
The fuel tank now cam be pulled away delicately from the vehicle and maneuvered until it is disconnected and comes free. It should be placed an adequate distance away from the scene, downhill and downwind.
Crews should follow local protocols for disposal of the fuel tank and its contents. Before the tow company removes the damaged vehicle from the scene, the operator should be advised what was done with the fuel system and tank of the vehicle that he/she will be towing.
During rescue and extrication training at the company level, particularly when the drill includes a rollover or side-resting acquired vehicle, crews should at least discuss techniques that are needed for them to complete the task of total fuel tank removal. From these training sessions, adequate materials can be acquired, and a protocol can be developed.
Fluid Management Size-Up
- Leaking or spilled fluid present?
- Source of leak or spill?
- Type of fluid?
- Safety measures in place?
- Spill or leak management task?

Ron Moore
RON MOORE, who is a Firehouse contributing editor, recently retired as a division chief with the McKinney, TX, Fire Department and now serves with Prosper, TX, Fire Rescue. He self-published the Vehicle Rescue 1-2-3 training manual and serves as the forum moderator for the extrication section of Firehouse.com . Moore can be contacted directly at [email protected].
