The cribbing stack has been used since the Bronze Age, when builders constructed the ancient wonders of the world. The rescue community naturally adopted this tool for use as temporary, incremental shoring. The problem with this conventional shoring method is that gravity and friction are the only forces that hold it in place. The loose connection points limit possible support locations. Further, the conventional crib stack must be built under the load limited to an arm’s length from the edge of the load. Sometimes, the best support locations aren’t available to responders, because these areas are too far under the load to safely support with that crib stack.
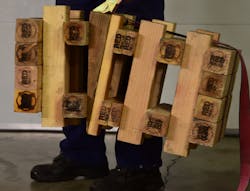
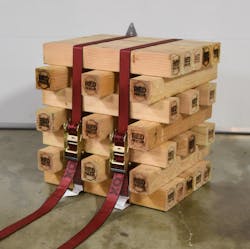
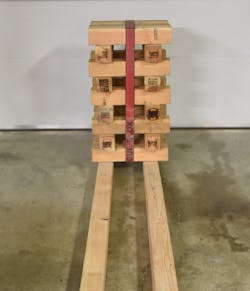
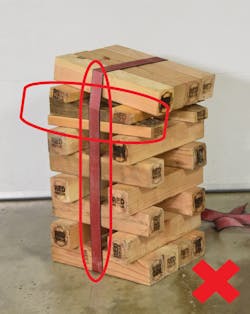
A lashed crib stack creates a maneuverable assembly that resists falling apart even when carried horizontally. It can be positioned using long reach tools and rigged with ropes to be hoisted or lowered (Photo 1).
Author’s note: I am on an endless search for more and more uses of RescueBlox, trying to make them as useful as the Halligan tool. I stumbled into a lashed crib stack when I secured RescueBlox to a crib box. The no-hook ratchet strap enabled me to create a singular unit that could be hauled, lifted and lowered into place. All of these uses have the same basic principles of construction, but they give first responders more options and more safety when supporting loads at the emergency scene.
Several organizations established standards for cribbing stacks. Every department must determine which standard to use. I am not recommending any specific standard or size, just offering options.
Some fire departments believe that all crib stacks must be built with 3½–4 inches of overhang to capture the cribbing as it compresses and mushrooms, or, in other words, fails. I agree that this is a prudent geometry when you must support three floors of a collapsed concrete garage that weighs more than 100,000 lbs., but if you must support an automobile, strict adherence to this geometry might be less stable because of a smaller footprint and might be more dangerous when accidentally loaded outside of the vertical connection columns.The vital component
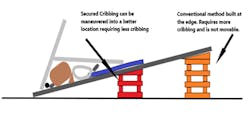
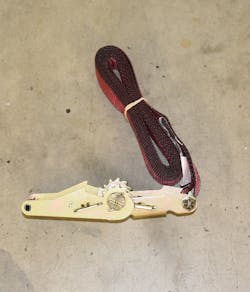
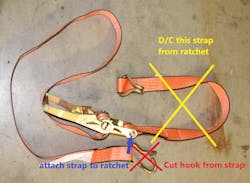
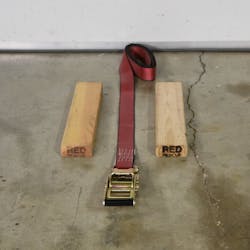
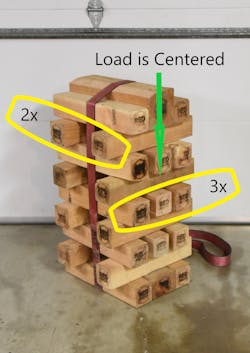
Most collapse loads usually are sloped, and they need a taller crib stack to support at the edge. A smaller secured crib stack can be placed farther under load for possibly better support, additional support or lifting with an airbag. This might save cribbing and will increase safety (Figure 1).For immediate proof of concept, an endless loop strap can be created from a two-hook strap. Unbolt the short hook strap from the ratchet. Cut off the hook of the longer strap. Use the sleeve of the long strap for bolt to secure to ratchet. If you determine that you want to add this to your toolbox, order straps that are manufactured for this purpose (Photo 3).
Footprint/base comparison
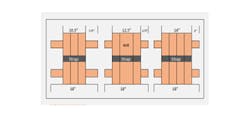
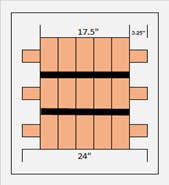
The three examples that are noted below are a 2 x (i.e., two members per course) crib stack, using four 4 x 18-inch cribbing. You can create numerous base sizes using a combination of dimensional lumber. Look at a couple of the combinations or create your own using custom-cut lumber.Figure 2 presents three possible courses. On the left, the course has three four-by-fours on both the base and the cap, making a 10½-inch footprint and a 3¾-inch overhang.
The center example has two four-by-fours and one four-by-six, with a 12½-inch footprint and a 2¾-inch overhang.
The example on the right has four four-by-fours, with a 14-inch footprint and a 2-inch overhang.Step 1. The foundation
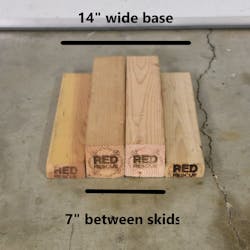
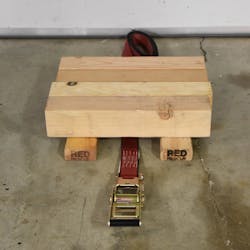
Starting the lashed crib stack on top of two two-by-fours or four-by-fours on the ground is the easiest way to position the strap centerline and recover from placing the ratchet facing the wrong way. When muscle memory kicks in, you can build the assembly directly on the ground or on skids (Photo 5).Step 2. Base course
Place the base course cribbing perpendicular to the ratchet strap on the ground to give you a solid base course to build on. The ratchet should be placed with pivot action toward the ground, so when completed, it will pivot away from the crib stack. Keep the ratchet low for access.Step 3. The body
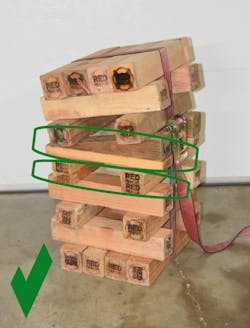
You may use two two-by-fours flat on top of each other, one two-by-four on a four-by-four for any middle course, or wedges, but don’t use them as a top course or the course that’s directly under the top course. If the load lands midspan, a two-by-four will have considerably less strength than a four-by-four.The top course and the course that’s directly under the top course should be a minimum four-by-four thickness in case of point-loading of the crib stack.
Building a crib stack that has two levels of wedges lashed isn’t possible. Place a second set of wedges loosely on the top course if needed to capture or chase the load.
Header assembly
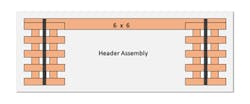
A six-by-six or four-by-four beam can be used to create a header assembly that centers the load on a crib stack. This can be for use on overturned automobiles at various vehicle positions to fulcrum the vehicle if a low-side lift is required.You also can use it to support collapsed walls and floors when structural points aren’t obvious (Figure 4).Moving the crib stack
Lashing enables responders to build and transport a cribbing assembly to the hot zone by carrying a single crib stack vertically or horizontally or moving a header assembly with several personnel. (A single 42-inch-high crib stack that consists of 30 four-by-fours will weigh 150 lbs.) Because of the extra cribbing for the base and cap, one assembly could use up all or most of a truck company’s cribbing complement
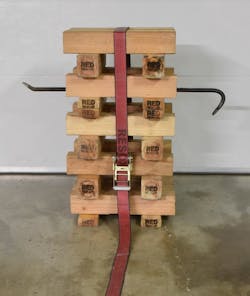
If skids are used, they must be placed on the same axis as the strap, which is perpendicular to the top and bottom courses.A second method is to place a pair of long reach tools (pike poles, pry bars or 2 x 4-inch studs) through the body of the crib stack toward the top courses to create litter handles to lift and maneuver (Photo 12).
Possible problems
This lashing a crib stack technique gives the stack integrity only for easy transport and positioning. Once a lashed assembly is loaded, it will compress. Care must be taken if you tighten the lashing. This will capture the stored energy, so when the load is removed, the lashing might break, which could create catastrophic consequences.
Check the cribbing that you stowed on your apparatus. Some pieces might be older than your youngest firefighters. Wood must have a specific range of moisture content to be at its strongest and must be the same nominal size to build the best lashed crib stack. If not, some members will be loose (even though I built a lashed crib stack out of chopped firewood). If you decide to cut new cribbing, buy #2 or better and cut between the knots and checks to make the strongest cribbing members and support systems.
I believe that this will enhance safety and effectiveness on the emergency scene. I wish this was in my toolbox years ago.
If you want more information on crib stacks, go to rescueblox.com and click the Crib Stacks tab at the top of the page.
About the Author

Steve Randall
Steve Randall is a 30-year veteran of the fire service and has served 23 years as a career firefighter for the Snoqualmie, WA, Fire Department. He is a certified Rope Rescue and Swiftwater Rescue Technician and is a fire and rescue industry inventor and entrepreneur. Randall can be reached at rescueblox.com.
